برگزیده های پرشین تولز

عکس های 3 بعدی من

hamedsullivan

مدیر بازنشسته
تاریخ عضویت
16 دسامبر 2005
نوشته‌ها
6,664
لایک‌ها
137
سن
44
محل سکونت
on the road
سلام

این روز ها بازار 3D داغ شده گفتم این تاپیک رو بزنم تا دوستانی که عکس س بعدی درسن می کنن اینجا قرار بدن.

لطفا فقط عکس هایی که کار خودتون هست قرار بدید.

برای دیدن باید از عینک مخصوص استفاده کنید.
 

فایل های ضمیمه

  • PT.jpg
    PT.jpg
    335.3 KB · نمایش ها: 84
  • PT2.jpg
    PT2.jpg
    689.3 KB · نمایش ها: 36
  • PT3.jpg
    PT3.jpg
    433.3 KB · نمایش ها: 35

Mr.4

همکار بازنشسته
کاربر فعال
تاریخ عضویت
12 آگوست 2008
نوشته‌ها
1,866
لایک‌ها
526
سن
94
محل سکونت
آسمانها و فراتر از آن
خوب شده مخصوصا اون اولی از سمت راست

شما از چه برنامه استفاده میکنید
 

hamedsullivan

مدیر بازنشسته
تاریخ عضویت
16 دسامبر 2005
نوشته‌ها
6,664
لایک‌ها
137
سن
44
محل سکونت
on the road
....................
 

فایل های ضمیمه

  • PT4.jpg
    PT4.jpg
    655 KB · نمایش ها: 42
  • PT5.jpg
    PT5.jpg
    566.8 KB · نمایش ها: 27

داش علی

کاربر فعال گرافیک
کاربر فعال
تاریخ عضویت
5 ژوئن 2008
نوشته‌ها
1,996
لایک‌ها
942
محل سکونت
داش علی
عالی شده. مخصوصا اون اسپری ها
 

hamedsullivan

مدیر بازنشسته
تاریخ عضویت
16 دسامبر 2005
نوشته‌ها
6,664
لایک‌ها
137
سن
44
محل سکونت
on the road
عالی شده. مخصوصا اون اسپری ها

ممنون.

حامد خان این عکسا رو چیطری گرفتی ؟
من iq پایینه متوجه نمیشم :blink:
من عینک هم ندارم که بخوام کیف کنم :D

خب باید عینک داشته باشی با فیلتر قرمز و آبی.

عکس که با دوربین دیجیتال گرفته شده .

البته هر تصویر 2 عکسه که تو فتوشاپ ردیف میشه.
 

hamedsullivan

مدیر بازنشسته
تاریخ عضویت
16 دسامبر 2005
نوشته‌ها
6,664
لایک‌ها
137
سن
44
محل سکونت
on the road
اینم یه عکس از یه مکان خوش آب و هوا که جای همتون خالی بود.
 

فایل های ضمیمه

  • Delir.jpg
    Delir.jpg
    302.9 KB · نمایش ها: 43

farhad2067

کاربر تازه وارد
تاریخ عضویت
4 جولای 2010
نوشته‌ها
15
لایک‌ها
0
چی جوری درست کردی ؟ گفتی آموزشش را می زارم
 

Fouad-PES

Registered User
تاریخ عضویت
17 آپریل 2009
نوشته‌ها
497
لایک‌ها
252
خیلی جالبن اما متاسفانه عینک 3d ندارم متاسفانه. مرســـی
 

bloody

کاربر فعال علم و دانش
کاربر فعال
تاریخ عضویت
19 آپریل 2007
نوشته‌ها
1,256
لایک‌ها
17
محل سکونت
IRAN
این از آموزش انگلیسی ،آموزش فارسی رو انشالله خود حامد جان با جزئیات میزاره :rolleyes:

1
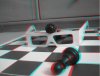
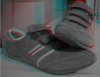
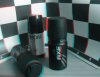
Find a subject to photograph. Your subject should be able to sit still, and it should contain some depth. Your buddy in front of a bare white wall will look as boring in 3-D as he or she does normally. Consider close-ups of detailed things. You will probably want to set your camera to macro mode - the symbol is typically a flower.

2
Your subject needs to be able to sit still because you will be taking two "as-identical-as-possible" photos: one for the left-eye view and one for the right. A tripod might be nice, but it certainly isn't necessary. Take the first photo, then move the camera about 2 inches (the distance between your eyes) to the right and try to retake the photo to be as identical to the last one as possible.

3
Copy the two images to your computer. Open in whatever photo editing program you prefer.

4
Convert the first (left) image to gray scale (yes, you are discarding color information).

5
Convert the second (right) image to gray scale, then reconvert it back to RGB. It should still appear gray.

6
Still working on your second image, change your program to a mode that controls color channels. Select just the Red channel (usually designated by an eye icon next to the selected channel.

7
Back on the first image, select all then copy
the image. Return to the second image and make sure the color channels are still displayed with only the Red channel selected. Now paste the first image that you copied. Now select the RGB channel. This replaces the Red channel of the second image with the first image. You should now see a gray scale image with red and blue halos.

8
Move the red layer around with the mouse or arrow keys so that the two line up, minimizing the halos.

9
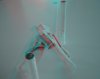
Examine the photo while wearing your red-blue glasses (red over the left eye). You can change the natural focal point of the photo by readjusting the red layer's alignment. Eliminate the halos around an object in your photo to make it the focal point.

10
If it is just not working for you, try looking through the glasses backwards (red over the right eye). When you have something you like, crop off the red and blue edges of the photo and save it. A well done 3-D photo should look mostly gray with small shadows of red and blue.​
 

bloody

کاربر فعال علم و دانش
کاربر فعال
تاریخ عضویت
19 آپریل 2007
نوشته‌ها
1,256
لایک‌ها
17
محل سکونت
IRAN
اینم چند نمونه از کارای من

البته عکس ها رو با گوشی موبایلم گرفتم و حجمش کم شده
 

فایل های ضمیمه

  • IMAG0110.jpg
    IMAG0110.jpg
    334.7 KB · نمایش ها: 18
  • 02.jpg
    02.jpg
    241.3 KB · نمایش ها: 13
  • 03.jpg
    03.jpg
    205.1 KB · نمایش ها: 9
  • 01.jpg
    01.jpg
    283.8 KB · نمایش ها: 10

radium

Registered User
تاریخ عضویت
24 جولای 2009
نوشته‌ها
392
لایک‌ها
4
آفرییییییییییییییین
خیلی خوشم اومد
 
بالا